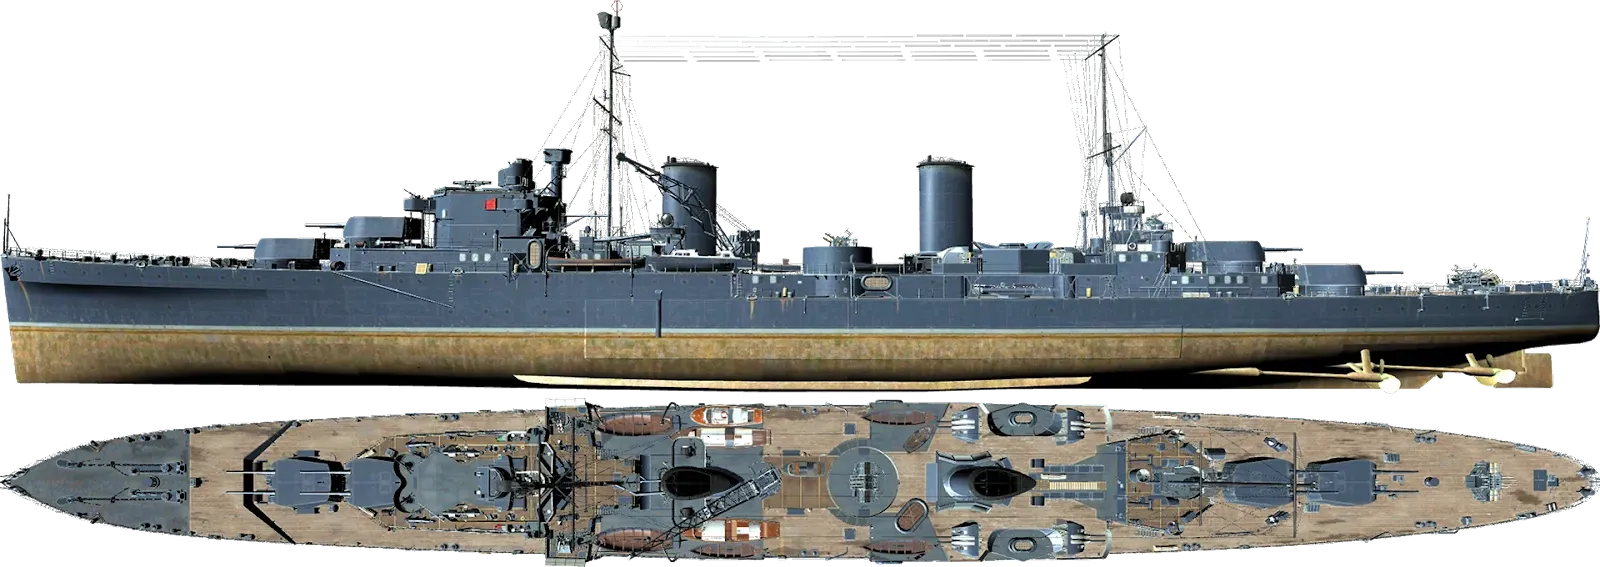
 Hobart: Tier VI Commonwealth (Australia) Cruiser 1936
Originally named Apollo, this warship was one of three ships constructed in Britain following the "improved Leander" design. She deviated from the prototype in her different powerplant layout and silhouette. In 1939, she joined the Royal Australian Navy and was renamed HMAS Hobart. During World War II, the cruiser participated in the Mediterranean campaign, in combat operations off the coast of Somalia, and in operations in the Indian and Pacific Oceans. HMAS Hobart was also present at the signing ceremony of Japan's surrender in Tokyo Bay.

Flip your mobile device to landscape for better viewing.
Hobart Info
Ship Name: 
 VI Hobart

Level: 6
WG introduction: Nov 30, 2023.
Release: 13.2 and 13.4
Status:  Researchable ship
Research cost:  36 000 Ship XP -
  3 000 000 Credits
 36 000 Ship XP -
  3 000 000 Credits
Nation:  Commonwealth (Canada)
 Commonwealth (Canada)
Status: Released
Armor
Hit Points: 27,400 hp
Fires duration: 30 s
Torpedo protection: 4 %
Armour: 10-100 mm
Deck Fore/Mid/Aft: 16/25-32/16 mm
Side Plating Fore/Mid/Aft: 16/16-100/16 mm
Fore Athwartships: 13 mm
Aft Athwartships: 13 mm
Citadel Fore Athwartships: 76 mm
Citadel Aft Athwartships: 37 mm
Turret Plating: 25 mm
Superstructure: 10 mm
Armor Belt: 100 mm
Plating: 16-100 mm
Citadel Deck: 10-37 mm
Citadel Bottom: 30 mm
Tonnage: 9,105
Main Battery Armament
4x2 152 mm/50 BL Mk.XXIII on a Mk.XXI mount:
Max Range: 14.4 km
Reload: 7.5 s
180° Turn Time: 30.0 s
Dispersion at Max Range: 137 m
Sigma: 2.00σ
Shell Types
High Explosive Shells
8x 152 mm HE 6crh Mk IV HE:
Maximum HE shell damage: 2100
Alpha Piercing HE: 25.0 mm
Shell Air Drag: 0.28
Shell Always Ricochet At: 60.0°
Normalization: 8.0°
Shell Detonator: 0.01
Shell Detonator Threshold: 2.0
Shell Diameter: 152 mm
Shell Krupp: 1.0
Shell Mass: 44.45
Shell Ricochet At: 91.0°
HE Shell initial velocity: 841.0 m/s
Chance of causing fire: 8.0%
Armor Piercing Shells
8x 152 mm AP 6crh Mk IV:
Maximum AP shell damage: 2850
Shell Air Drag: 0.28
Shell Always Ricochet At: 60.0°
Normalization: 8.5°
Shell Detonator: 0.025
Shell Detonator Threshold: 25.0 mm
Shell Diametr: 152 mm
Shell Krupp: 2811.0
Shell Mass: 44.45
Shell Ricochet At: 45.0°
AP Shell initial velocity: 841.0 m/s
Secondaries
4×2 102 mm/45 QF Mk.XVI on a Mk.XIX mount HE:
Maximum HE shell damage: 1,500
Range: 5.0 km
Reload: 3.0 s
Air Drag: 0.33
Alpha Piercing HE: 17 mm
HE initial velocity: 811 m/s
Chance Of Fire: 6%
Torpedoes
2x4 533 mm QR Mk IV/533 mm Mk IX:
Damage: 15,433 hp
Range: 10.0 km
Speed: 62 kts
Reload: 96 s
180° Turn Time: 7.2 s
Visibility Distance: 1.3 km
Depth Charge Airstrike
Max bomb damage: 2,300
Available flights: 2
Attacking flight aircraft: 1
Bombs in payload: 1x 100-LB. Bomb MK VIII HE
Range: 7.0 km
Reload: 20 s
Chance of fire: 19%
Anti Aircraft Defence
Long Range:
4x2 102 mm/45 QF Mk.XVI on a Mk.XIX mount:
Action Zone: 3.5-5.8 km
Hit Probability: 90 %
Damage Within an Explosion: 1120
Continuous Damage Per Second: 60
Number of Explosions Per Salvo: 2
Continuous Damage: 114
Medium Range:
2x8 40 mm/39 Vickers QF Mk.VIII on a Mk.VI mount:
Action Zone: 2.5 km
Hit Probability: 90 %
Damage by Zone Area AA: 88
Short Range:
4x1 20 mm Oerlikon on a Mk.4 mount:
3x2 20 mm Oerlikon Mk.II on a Mk.V mount:
3x2 20 mm Oerlikon Mk.II on a Mk.V mount:
Action Zone: 2.0 km
Hit Probability: 85 %
Damage by Zone Area AA: 88
Mobility
Maximum Speed: 32.5 kts
Turning Circle Radius: 640 m
Rudder Shift Time: 7.6 s
Propulsion: 72,000 hp
Visibility
Surface Detectability: 10.8 km
Air Detectability: 6.4 km
Detectability after Firing Main Guns in Smoke: 5.1 km
Available Consumables
Slot 1: Damage Control Party:
Work Time: 5 s
Reload Time: 60 s
Slot 2: Hydroacoustic Search
Charges: 3
Action time: 100 s
Reload Time: 120 s
Torpedo detection range: 3.0 km
Ship detection range: 4.0 km
Slot 2: Defensive AA Fire:
Charges: 3
Action Time: 40 s
Reload Time: 80 s
Slot 3: Crawling Smoke Generator:
Charges: 3
Action time: 102 s
Smoke screen dispersion time: 10 s
Reload time: 160 s
Radius: 0.45 km
Slot 4: Submarine Surveillance:
Charges: 3
Action time: 20 s
Reload time: 120 s
Submarine detection distance: 6 km


Hobart looks to be superior to Perth in every respect, rendering it pretty much obsolete.
ReplyDelete